Over the course of the semester we have gotten to know each of our own camera’s almost as if it were an extension of our own body. We’ve traveled with them, been through inclement weather with them, and preserved numerous memories and moments with them. We understand they after 3 months better than we did before and have learned to recognize the small functions about traditional cameras that have been lost in the transition to digital. These “manual” methods include things like shutter speed, adjusting the aperture, ISO, depth of field, and the light meter.
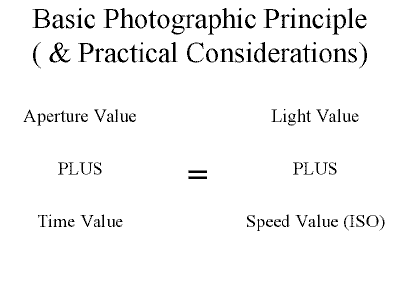
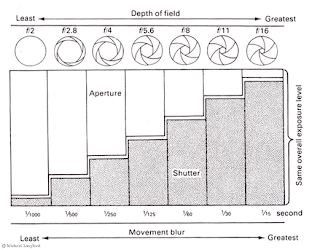
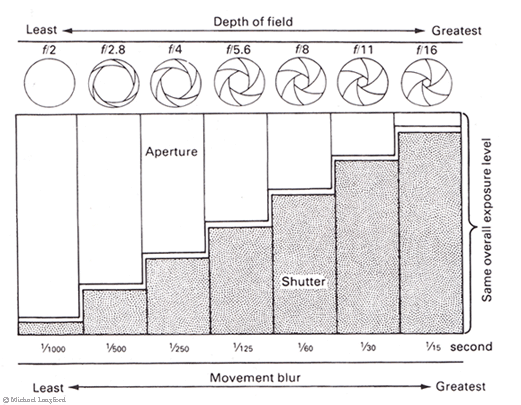
The diaphragm acts for the camera much like the pupil in the human eye; it regulated how much light reaches the sensors (film). The larger the aperture (a smaller f-stop number) allows more light to enter the camera exposing the film more. Visa-a-vie the smaller the aperture (a larger f-stop number), less light reaches the film. The f-stop numbers are traditionally listed right on the lens of the camera, the stops are 1.4, 2, 2.8, 4, 5.6, 8, 11, 16, 22. Some cameras even offer a middle stop between each one of the traditional f-stops; such as the cameras used this semester.
The shutter speed goes hand in hand with the diaphragm as they often balance each other out. The shutter control how long the camera allows light to enter for and burn an image onto the film. A faster setting allows less light to enter, and a slower setting gives the light a lot more time to exposure the film. Camera speeds went from 1 second, ½. ¼, 1/8, 1/15, 1/30, 1/60, 1/125, 1/250, 1/500, 1/1000. Usually when you have a higher aperture, you are going to want a faster speed, so you don’t overexpose your picture, and vice versa. The ideal setting is a speed of 1/30 with a diaphragm of 5.6, but say you wanted to use a diaphragm of 2.8 you’d offset this change by using a speed of 1/125. With changing your shutter speed, always note that anything slower than 1/30 you’ll want to use a tripod for otherwise the photos will turn out quite blurry.
The depth of field is an important aspect of traditional photography. It is the distance between the subjects of your photograph. The span between what is in the foreground of your picture and what is in the background. A shallow depth of field would only focus on the things closest to you in the photograph, whereas a large depth would include have almost everything you saw in the photo in focus. Your length of lens determines the depth of field of the photo; a long lens (telephoto) gives you a smaller depth of field because it allows you to zoom in more on subject matter, whereas a wider angle gives you a much larger depth of field and farther focal distance.
The ISO is the sensitivity of the film that you use in your camera. For more light situations, you’d use a higher sensitivity ISO, where for a less light situation (like in an opera or play) you’d use lower sensitivity ISO. We used ISO 400 film that is more of a multi-purpose any situation film. As you move high up the ISO scale the film becomes more and more grainy.
The light meter measures how much light is coming in through your lens and how exposed your photo will be when you finally snap the shot. It doesn’t change anything and there is no adjusting it, it is purely informational and very crucial for good photography. It let’s you know what speed and aperture you should set your camera at when taking a photograph in this lighting. Not all cameras come equipped with one inside, so there are handheld light meters as well, that serve the same purpose, if you just hold them up to your subject if will tell you your prime speed and aperture.
There is a lot more to traditional photography that has been lost with the newer generation due to the simplicity of digital cameras, but all good things lie in learning the basic first and understand how things work. This has just covered the unique process of taking the pictures but there is so much more information that we learned this semester in the process of developing and printing your film as well. Traditional photography has been fascinating and has spawned numerous ideas in my head for future photographs digital and traditional. I’m positive this is a hobby that I will not abandon quickly.
Monday, December 13, 2010
Final Post
Review of Basic Film Photography (last post):
By: Jennifer Maldonado
DIAPHRAGM

SHUTTER SPEED
DEPTH OF FIELD
ISO
KELVIN
FILL IN FLASH
By: Jennifer Maldonado
Sources of Photographs:
http://picasaweb.google.com/lh/photo/SStYiZcF6RPL8-vT6_-kbw
http://www.frigidlight.com/2010/02/08/2nd-round-of-prints-f-stop-and-depth-of-field/
http://frigidlight.com/gallery/albums/userpics/10001/Herro.jpg
http://thephotobox.yuku.com/topic/4020
http://www.flickr.com/photos/konaboy/72845202/
http://www.digital-photography-school.com/shutter-speed
http://www.cameracity.info/panasonic-lumix-fz35
http://www.photoreview.com.au/guides/digitalslr/iso-and-white-balance.aspx
http://thediscerningphotographer.com/2009/08/16/kelvin-temperature-in-photography/
By: Jennifer Maldonado
DIAPHRAGM
- The lens opening inside a photographic lens (also known as the aperture)
- Regulates the amount of light that the film is exposed to, when taking a photograph
- (Indicated by the F-number figures, which are listed on the lens of the camera--i.e. 1.4, 2, 2.8, 4, 5.6, 8, 11, 16, 22")
- The greater the F-number (the SMALLER the diaphragm) = LESS light enters
- The smaller the F-number (the wider the diaphragm) = MORE light enters

- Controls how long light enters the camera (and into the film)
- Slower shutter speed = More light
- Faster shutter speed = Less light
- (i.e. "...8, 15, 30, 60, 125, 250, 500, 1000")
 |
| Slow Shutter Speed |
 |
| Fast Shutter Speed |
- The distance between the foreground & background of the subject that appears to be in focus
- There are 2 types of depth of field:
- Shallow depth of field-- One point in the foreground is in focus, and the background is blurred
- Great (maximum) depth of field-- Nearly everything is focused
- Determined by the length of the lens
- Larger aperture & closer focal distance (long lens) = Shallower depth of field (i.e. A telephoto lens)
- Smaller aperture & farther focal distance = Greater depth of field
 |
| (Blurred Foreground and Focused Background) |
 |
| Shallow Depth of Field (Focused Foreground and Blurred Background) |
ISO
- Film sensor sensitivity (related to the amount of light you have)
- Higher sensitivity = More light (can take pictures in the dark with a very high ISO)
- Lower sensitivity = Less light (You will need to open the diaphragm to obtain more light)
- Greater ISO = grain :(
- Low ISO minimizes the effect of noise in the photograph!
 |
| High ISO (Sensitivity) |
 |
| Low ISO (Sensitivity) |
KELVIN
- Color temperature (a measurement of the lighting)
- Warm = Low
- Cool = High
- Normal daylight = ~5,500 degrees Kelvin
 |
| Kelvin Color Temperatures |
LIGHT METER
- Measures how much light is coming into the camera (determines the exposure of the photograph)
- There are 2 types of light meters:
- Hand-held light meter
- Built in light meter
- Used to produce the desired exposure levels
 |
| Hand-held light meter (http://en.wikipedia.org/wiki/File:Digital_ambient_light_meter.jpg) |
FILL IN FLASH
- Used in bright light to reveal details in darker, shadowed areas
- Can also be used when a shot is backlit (bright light behind the subject)
- Used frequently outdoors and helps produce photographs with brighter colors!
- Indicated on the Minolta 35 mm camera on a dial (i.e. -2, -1, 0, +1, +2)
- Use the negative numbers if...There are bright lights in front and it is darker in the background (i.e. Theater photography)
- Use the positive numbers if...There is a bright light behind the subject (the subject is in a shadow)
By: Jennifer Maldonado
Sources of Photographs:
http://picasaweb.google.com/lh/photo/SStYiZcF6RPL8-vT6_-kbw
http://www.frigidlight.com/2010/02/08/2nd-round-of-prints-f-stop-and-depth-of-field/
http://frigidlight.com/gallery/albums/userpics/10001/Herro.jpg
http://thephotobox.yuku.com/topic/4020
http://www.flickr.com/photos/konaboy/72845202/
http://www.digital-photography-school.com/shutter-speed
http://www.cameracity.info/panasonic-lumix-fz35
http://www.photoreview.com.au/guides/digitalslr/iso-and-white-balance.aspx
http://thediscerningphotographer.com/2009/08/16/kelvin-temperature-in-photography/
This semester in Basic Film Photography
Film Photography
Allison Garlick
ISO
· Indication of how sensitive a film is to light.
· Measured in the numbers 100, 200, 400 & 800.
· Lower the number means it has a lower sensitivity to light.
Film Exposure- amount of light allowed through the camera lens and onto the film. This is controlled by the intensity of light, or aperture, and length of time, or shutter speed.
Aperture
· Refers to the opening and closing of the diaphragm inside the camera lens.
· The hole or opening formed by the diaphragm inside the lens or the opening in a camera lens through which light passes to expose the film.
· Aperture size is usually measured in f-stops
· On my camera: f/1.8, f/2.8, f/4, f/5.6, f/8, f/11, f/16, f/22
· Large aperture size (open diaphragm) = smaller f/stop number
· Small aperture size (closed diaphragm) = larger f/stop number
Diaphragm- The size of the diaphragm in a camera lens directly regulates the amount of light that comes through onto the film when the shutter curtain opens during an exposure process.

Shutter Speed
· Duration (timing) at which the shutter curtain opens up and closes during an exposure process.
· It controls the degree of movement in your pictures
· Film cameras have a shutter speed dial on the top of the camera body to adjust shutter speed.
· From slowest to fastest shutter speed: 2 seconds, 1 second, ½ second, ¼ second, 1/8 second, 1/15 second, 1/30 second, 1/30 second, 1/60 second, 1/125 second, 1/250 second, 1/500 second & 1/1000 second.
· A 1/125 setting means the shutter curtain open and close within one hundred and twenty five of a second while 1 means an one full-second the shutter opens up during exposure to absorb the available light source onto the film to form an exposure.
Depth of Field
· The zone of acceptable sharpness in front of and behind the subject on which the lens is focused
· Factors affecting depth of field:
· Aperture
· Focal length of lens
· Distance to subject
· The wider the aperture + the longer the focal length + the closer the focused distance = the less the depth of field.
Sunday, December 12, 2010
Final Post by Mary Capaldo
Diaphragm: The diaphragm opens and closes to allow light to reach the film plane or sensor. The size of the diaphragm in the lens regulates the amount of light that enters the camera and reaches the film or sensor.
Depth of Field: This is determined by the length of the lens. Depth of field refers to the distance between the closest object in an image and the farthest object in an image and their sharpness. Portraits usually have a very shallow depth of field, while landscape and architectural photographs typically have a very wide depth of field.
Open diaphragm -> Smaller depth of film
Closed diaphragm -> Larger depth of film
Closed diaphragm -> Less light
Good Picture = Right combination
Shutter Speed: This determines how much light goes into the camera. It determines the length of time light reaches the camera's sensor or film. The shutter speed is indicated in terms of fractions of a second. A shutter speed of 1/125 means the shutter curtain opens and closes in 1/125th of a second. A shutter speed of one means the shutter opens and closes in one second. The minimum is 1/30 and the maximum is 1/1000. A fast speed = less light. Wide angle = depth of field increase.
ISO: Sensor sensitivity. How the film reacts to light. Low ISO = less light.
ISO 100 or 200 film speeds are best for bright lighting conditions and outdoor photography.
ISO 400 film speed is a great all-purpose film that can be used for most situations.
Fast speed film will result in the grainiest photographs but is great to use when shooting fast-moving subjects in low light conditions.
Low speed = more light
High speed = less light
High sensitivity = more light
Low sensitivity = less light
High ISO (1600+) = grainy
Light Meter: Measures how much light is coming in the camera.
The measurement of color temperature is in Kelvin degrees.
Fill flash or "fill-in flash" describes flash used to supplement ambient light in order to illuminate a subject close to the camera that would otherwise be in shade relative to the rest of the scene.
FINAL
Final will on Monday the 13th in via del Mattonato from 15:00 to 17:30
See you on Monday
Best
S.A
See you on Monday
Best
S.A
Monday, December 6, 2010
The semester in short by Claudia Rotondo
Diaphragm:
The diaphragm, located in the lens, is what allows more or less light into the camera, depending on how wide or small the opening is. The numbers on the diaphram go (smallest to largest) 22, 16, 11, 8, 5.6, 4, 2.8,2, 1.4.
 The shutter speed is how fast the shutter stays open, dependsing on how much light is entering the camera. The more light there is, the faster the shutter speed. The less light there is, the longer the shutter speed. The slowest speed one can use while using a hand/held camera is one thirtieth of a second. The shutter speeds are 2, 1, 1/2, 1/4, 1/8, 1/15, 1/30, 1/60, 1/125, 1/250, 1/500, 1/1000, and 1/2000.
 Depth of field - the longer the lens, the less depth of field and vice versa. This is the contrast between a focused part of the picture and an unfocused part, and the length of space between them in relation to the size of the aperture.
 The ISO is the how sensitive the film is to the light. The lower the number, the less sensitive the film is to the light. Also, the lower the number the finer the grain. Higher numbers, such as 1600 ISO, are very sensitive to the light and the grain is much more coarse looking.
The temperature of color is measured in kelvin. Indoor light is 3200 K and outdoor light is 5600 K.
The light meter measures how much light the picture should be taken with, depending on the size of the aperature and the shutter speed.
Claudia Rotondo
The diaphragm, located in the lens, is what allows more or less light into the camera, depending on how wide or small the opening is. The numbers on the diaphram go (smallest to largest) 22, 16, 11, 8, 5.6, 4, 2.8,2, 1.4.


The temperature of color is measured in kelvin. Indoor light is 3200 K and outdoor light is 5600 K.
The light meter measures how much light the picture should be taken with, depending on the size of the aperature and the shutter speed.
Claudia Rotondo

Sunday, December 5, 2010
Final Post-Christine Tampakis
Christine Tampakis
Photo Final Blog Post
Diaphragm- Diaphragm- The diaphragm is what is used to adjust the amount of light that passes through the aperture. A higher f-stop will let less light in while a lower f-stop will let more light in. A series of leaves in the lens increases of decreases the opening. The f-stop numbers are 1.4,2,2.8,4,5.6,8,11,16,22, and 32.

Shutter Speed- The shutter speed is how long the shutter is open during an exposure. Varying the shutter speed controls the pictures exposure to light. If you are taking a picture at night, where there is very little light the shutter speed will be very slow allowing as much light as possible to get in. For daytime shooting or shooting in situations with optimal lighting, you would use a very fast shutter speed therefore letting less light in. If you have a medium amount of lighting your shutter speed will be somewhere in the middle. Speeds range from 1 second to 1/2,000 .


Depth of field-The depth of field usually is referring to the fact that there is a very sharp part of an image as well as a blurred part of an image. This contrast is essentially the depth of field. A few things determine the depth of field; camera to subject distance, the focal length of the lens, the f-stop number as well as the size of format.
Iso-In film photography the ISO or ASA is how sensitive to light the film is. So for example in class we are using a 400 asa film which is for outdoor photography. The lower the number the lower the sensitivity of the film and the finer the grain. Generally there are four things you need to focus on when deciding what iso to use; light, grain, movement and whether or not you are using a tripod. A higher iso would be needed in museums and concerts and things with low light.
Kelvin-Kelvin is the unit in which color temperature is measured. Indoor light is 3200 degrees kelvin and outdoor light is 5600 degrees Kelvin.
Light Meter-The light meter is usually inside your camera yet you can get external light meters as well. It is there to tell you if the light coming into your camera is enough light for the photo. This allows you to change your shutter speed or aperture settings in order to have a good picture. You can change accordingly depending on what the light meter says.
What I've learned over the semester by Mark Glaser
Camera Usage
Photographic cameras deal with a few different mechanics
1.4 is the largest diaphragm opening on cameras. This allows the most light to enter the camera. The higher you go in f numbers the less light enters into the camera.
Depth of field is the portion of the scene that appears sharp in the image. The depth of field is determined by the camera to subject distance, the lens focal length, and the aperture. An open diaphragm produces a smaller depth of field. A smaller diaphragm opening produces a larger depth of field.
ISO is the sensitivity of the film. Ranges from 50-6400. Low ISO = low sensitivity (vice versa). A low ISO film speed will produce a very fine grain however. A low ISO should be used in a very dark scene. A high sensitivity will need more light, a low sensitivity will need less light. High ISO film speed will produce a large grain. 400 ISO is good for inside and outside, it produces a good quality grain.
Kelvin relates to color temperature for photography. Indoor light (incandescent bulbs) is 3,200 degrees kelvin. Daylight like the sun is 5,600 degrees kelvin.
The light meter will measure how much light comes into the camera which helps you figure out the right aperture and shutter speed.
Preparing roll for developing
For those of you who didn't go into the dark room last class to put our negatives into the developer tank, this is what we did.
1. Before turning the light off have all of your items ready so you know where everything is (developer tank, scissors, spiral, roll of film)
2. Turn the lights off, make sure the doors are secured, and no light gets in.
3. Insert negative into spiral, make sure the tabs of the spiral that hold the negative are parallel.
4. Pull out some of the negative
5. Start turning the spiral slowly, make sure you don't force it.
6. Once the film canister is up against the spiral, pull out more of the negative.
7. Turn the spiral once again slowly, and smoothly.
8. Once all the negative is on the spiral, cut the end of the negative off of the film canister, and wind rest of negative onto the spiral.
9. Put the spiral onto the rod that holds it steady in the developing tank.
10. Place into the developing tank.
11. Put cap on and turn to make sure it clicks.
12. Once the cap is on the tank securely allowing no light to enter into it, you can turn the lights back on.
After these steps you are ready to insert the chemicals.
Preparing chemicals for developing
The Enlarger is that machine in the dark room you must use in order to create test strips, contact sheets and prints. With the knob at back you can raise and lower the enlarger. This allows you to decide the dimensions of the borders of your print. With the knob on the enlarger, you are able to focus the negative projection. You must insert a filter into the top shelf of the enlarger. Use a number 2 filter, as it is flexible for starting you test strips and contact sheets. Insert the negative into the lower shelf, paying attention to make sure that the numbers on the negative are not upside down, and especially important, that the negative is not reversed, meaning glossy side needs to be up. Then focus the negative with the enlarger. Once it seems in focus, use the focometer to make sure the grain is in focus. At right on the table you will find the timer. It has a switch with three settings. The top switch provides continuous light, the middle setting is stand by, and switching down is off.
When you are ready to set the timer for your test strip, make sure the red filter is screening the enlarger light. This way you can place the photo paper beneath the lens without burning it to focus. Set the timer while the switch is at standby, and remove the red filter to allow light to expose the paper. Make sure all extra photo paper is already put away so as to not expose it to the light. Press the orange button for the timed light exposure to occur. In order to choose a time setting, guess at first, the more printing you do, the easier it will become to have an idea of exposure length.
Once the light switches off, place the paper in the developer for a maximum of 3min. Then in the water for about 30sec. Then in the Fixer for a minute or two. Then move it too the water. Leave it for a few minutes, then press it against the cabinet so it stick, and at an angle so the water runs free of it leaving it dry.
-MARK GLASER
Photographic cameras deal with a few different mechanics
- Image Capture - traditional film cameras capture light onto photographic film. The film is light sensitive, therefore when it is exposed to light an image is burned into the film with the light coming into the camera.
- Lens - The lens of a camera capture the light from the subject and brings it to a focus on the film. Camera lenses are made in various focal lengths. They range from extreme wide angle, wide angle, standard, medium telephoto, and telephoto among others.
- Focus - Only objects within a limited range of distances from the camera will be reproduced clearly. The process of adjusting this range is called focus.
- Exposure control - the size of the diaphragm or aperture and the brightness of the scene controls the amount of light that enters the camera. You can change the diaphragms opening with f numbers. On typical cameras f numbers include, 1.4, 2, 2.8, 4, 5.6, 8, 11, 16, 22, and 32.
- Shutter - the shutter controls the length of time that the light hits the recording surface. Normals shutter speeds include (1/shutter speed number) 1, 2, 4, 8, 15, 30, 60, 125, 250, 500, 1000, 2000. Some cameras have an extended range.
1.4 is the largest diaphragm opening on cameras. This allows the most light to enter the camera. The higher you go in f numbers the less light enters into the camera.
Depth of field is the portion of the scene that appears sharp in the image. The depth of field is determined by the camera to subject distance, the lens focal length, and the aperture. An open diaphragm produces a smaller depth of field. A smaller diaphragm opening produces a larger depth of field.
ISO is the sensitivity of the film. Ranges from 50-6400. Low ISO = low sensitivity (vice versa). A low ISO film speed will produce a very fine grain however. A low ISO should be used in a very dark scene. A high sensitivity will need more light, a low sensitivity will need less light. High ISO film speed will produce a large grain. 400 ISO is good for inside and outside, it produces a good quality grain.
Kelvin relates to color temperature for photography. Indoor light (incandescent bulbs) is 3,200 degrees kelvin. Daylight like the sun is 5,600 degrees kelvin.
The light meter will measure how much light comes into the camera which helps you figure out the right aperture and shutter speed.
How to Develop Film
- When you finish your roll, look at your dial.
- Turn the dial counterclockwise until you hear a click.
- Pull the dial up, doing that will open the back of the camera.
- Take the roll out of the camera.
- Extract the film with the extractor so you have a small tongue.
Putting negative into the developer tank in dark room
1. Before turning the light off have all of your items ready so you know where everything is (developer tank, scissors, spiral, roll of film)
2. Turn the lights off, make sure the doors are secured, and no light gets in.
3. Insert negative into spiral, make sure the tabs of the spiral that hold the negative are parallel.
4. Pull out some of the negative
5. Start turning the spiral slowly, make sure you don't force it.
6. Once the film canister is up against the spiral, pull out more of the negative.
7. Turn the spiral once again slowly, and smoothly.
8. Once all the negative is on the spiral, cut the end of the negative off of the film canister, and wind rest of negative onto the spiral.
9. Put the spiral onto the rod that holds it steady in the developing tank.
10. Place into the developing tank.
11. Put cap on and turn to make sure it clicks.
12. Once the cap is on the tank securely allowing no light to enter into it, you can turn the lights back on.
After these steps you are ready to insert the chemicals.
Preparing chemicals for developing
- When you insert the film in the tank you need to prepare the chemicals
- Prepare water at 20 degrees, MUST BE 20 DEGREES!!!!
- Prepare the chemicals with the water using Ilfosol 3 (developer), 1 part of Ilfosol 3, with 9 parts of water at 20 degrees, for 500 of water, 55 of developer.
- Prepare the fixer 1 part of fixer to 4 parts of water, for 440 of water, 110 of fixer
- If you develop Ilford HP5 at 400 ISO, 6 1/2 minutes of developer
- If you develop KODAK TMAX at 400 ISO, 6 minutes of developer
- When you insert developer into tank you need 10 to 20 seconds at beginning of agitation, then one turn every 30 seconds, till the end of your developing time.
- Remove the developer and insert the stop, water, for 30 seconds to 1 minute continuous agitation
- Then insert the fixer AT 20 DEGREES, for 3 minutes, after you put in the fixer continuous agitation for 30 minutes then stop for 15 seconds, agitate for 15 seconds, stop for 15 seconds etc. until the 3 minutes is up.
- After 3 minutes pour out the fixer
- Put it under running water for 20 minutes continuously.
- Extract film, hang to dry
The Enlarger and developing prints
When you are ready to set the timer for your test strip, make sure the red filter is screening the enlarger light. This way you can place the photo paper beneath the lens without burning it to focus. Set the timer while the switch is at standby, and remove the red filter to allow light to expose the paper. Make sure all extra photo paper is already put away so as to not expose it to the light. Press the orange button for the timed light exposure to occur. In order to choose a time setting, guess at first, the more printing you do, the easier it will become to have an idea of exposure length.
Once the light switches off, place the paper in the developer for a maximum of 3min. Then in the water for about 30sec. Then in the Fixer for a minute or two. Then move it too the water. Leave it for a few minutes, then press it against the cabinet so it stick, and at an angle so the water runs free of it leaving it dry.
-MARK GLASER
Monday, November 22, 2010
Rolleiflex
The Rolleiflex twin lens reflex (TLR) cameras were known for their compact size, reduced weight, superior optics, durable and simple mechanics and bright viewfinders. An ingenious tapered mirror allowed the size of the viewing lens (the top lens) 'internal compartment' to be reduced, and this smaller compartment was dovetailed with the bottom taking lens 'compartment', which decreased the overall size and weight of the camera. The lenses were high quality and were manufactured by Zeiss and Schneider, which differentiated the Rolleiflex from its competitors. The mechanical wind mechanism also allowed for quick semi automatic film loading.

-Mark Glaser
-Mark Glaser
Sunday, November 14, 2010
Long Exposure Photography
the world of traditional photography, the ISO (formerly ASA) represents the speed of photographic negative. ISO speed has a direct effect on the combination of shutter speed / aperture of the diaphragm. In an environment where the light is insufficient, and for various reasons you can’t use the flash, the only option available to capture the scene with a correct exposure is to increase the ISO speed.
When a scene includes both stationary and moving subjects (for example, a fixed street and moving cars or a camera within a car showing a fixed dash-board and moving scenery), a slow shutter speed can cause interesting effects, such as light trails.
Long exposures are easiest to accomplish in low-light conditions, but can be done in brighter light using neutral density filters or specially designed cameras.
Night photography

photo by MumbleyJoe - exposure: 114 sec

By leaving the camera's shutter open for an extended period of time, more light is absorbed, creating a brighter product. If the camera is stationary for the entire period of time that the shutter is open, a very vibrant and clear photograph can be produced
Light painting

photography by BUR?BLUE - Exposure: 656 sec 
In this technique, a scene is kept very dark and the photographer or an assistant takes a light source—it can be small penlight—and moves it about in patterns. The light source can be turned off between strokes
Water and long exposure

photography by Forest Wander- Exposure: 30 sec
Long exposures can blur moving water so it has mist-like qualities while keeping stationary objects like land and structures sharp
- Helena Salvo
Monday, October 25, 2010
Guide to develop and print film and paper

http://reviews.ebay.com/Traditional-Black-amp-White-Print-Processing_
W0QQugidZ10000000005661073
I have written a guide on Black & White Film Processing, and when I sum up the facts, it is a lot easier to process film than it is to make a print in the darkroom, one that displays all of the intent you had when you pressed the shutter of your camera.
Let's start from the beginning. I’ve come to find out that print processing takes a lot of experience to do truly well. How to maximize the inherent potential in a given paper with a certain developer and to eke out the maximum of each negative is knowledge that is seriously hard work to come by. I'll try to advice on how to get a good start.
1. To choose a negative. If you look at your negatives on a light table, or hold it up against a window while there's daylight, to choose a 'technically' good negative, you should see detail in both the 'thinnest' and the 'densest' areas of it. Ideally it should also not have completely 'empty' thin areas (shadows or dark areas in the print) and completely black or opaque dense areas (highlights). That is more brightness range than most papers can handle.
2. To get a print without worrying about quality, it's easy to put the negative in the enlarger, raise the enlarger head to the appropriate height and printing size, focus on the paper easel, turn the enlarger lamp off, insert a paper, turn the lamp on again for some arbitrary time, move the print to the developer and leave it in there while agitating and removing it when it looks OK, then put it in the stop bath and finally fixer.
This way you will get something resembling a photographic print, but most likely a really bad one.
Getting good prints is really down to developing a good process, and for that you need a few things:
- Paper. I started with resin coated variable contrast paper, because it's cheap and available in many places still.
- Enlarger, with a lamp, lens, negative carrier, easel, focusing aid, and variable contrast filters.
- Paper developer, stop bath (water works fine if you change it every few prints), and fresh fixer.
- Safelight.
- Trays (one paper size larger than the paper you're using preferably), tongs.
- Beakers / graduates to mix chemistry, and a thermometer for temperature.
- A dark space.
- Dry compressed air to blow dust off negatives.
- Patience of a saint, dedication, and an understanding that it takes a LOT of time to get the results you want.
3. Contrast - what is it?
Contrast is the difference in tone between the darkest black and the brightest white that you produce in a print. There is overall contrast and local contrast.
Overall contrast is a judgement of the entire print where you see a good range of tones between black and white, along with a strong black and crisp whites.
Local contrast is basically the same thing but it talks about minute details of the print. Good local contrast aids in seeing the details of the print clearer, by having clear distinctions between bordering or 'local' tonal values.
Low contrast prints are thought of as looking ‘muddy’ by some, but can be very effective and beautiful with the right subject matter. High contrast prints look very ‘snappy’ to some and can be equally beautiful if used appropriately and creatively.
4. Paper Grades – Contrast Variations
Let's talk about paper, the first item needed. There are many kinds, but basically there are two categories:
A. Graded - graded paper has the same contrast from sheet to sheet in the same box, but are available in various contrast grades to purchase. Ilford Galerie is an example, and it is available in contrast grade 2 and 3. Once upon a time you could get 0, 1, 2, 3, 4, and 5 with 0 being the softest (least contrast) and 5 being the hardest (highest contrast). The availability today is grades 2, 3, and 4.
With graded paper, what determines the final contrast in the finished print is almost exclusively the contrast of your negative. This requires experience because you have to be able to interpret negatives and their contrast before you print them in order to select the correct paper. (Or if you are really good at what you are doing you can 'tailor' your negatives to always print well on a certain grade of paper).
B. Variable contrast - this type of paper is available as one single 'type', but you can vary the contrast by using multi contrast filters. With these filters you can vary the contrast according to the same contrast levels as graded paper, and sometimes more. The Ilford set that I have contains filters for grades: 00, 0, 0.5, 1, 1.5, 2, 2.5, 3, 3.5, 4, 4.5, and 5. It is my opinion that not all of them are necessary, and I actually only use two of them, and I will explain why a little bit further down. These filters are designed to be introduced somewhere in the 'light path' between the enlarger light source and the printing-paper surface. Some enlargers have drawers they go in, others have small fixtures under the lens. The effect is the same.
Black & White photo paper is essentially sensitive to blue and green light. The graded papers are used without filters and are exposed to whatever blue and green light the light source (filtered through the negative) produces.
The variable contrast filters vary and determine how much blue and green light reaches the paper and therefore alters the contrast.
5 – Choice: Variable Contrast Paper
I will focus on using variable contrast paper, as it is by far the most commonly used, and it is the most economical to stock in your darkroom as you only need one box for all grades needed, while if you used graded paper, you would have to get one box of each grade, at least until you learn how to master 'tailoring' the negatives to a certain grade. Some people use graded paper with beautiful results, others use variable contrast; it’s mainly personal preference that dictates what you actually use.
6. Print density.
Print density is basically how dark the whole print becomes after it has been processed. There are three factors determining how dark your print will become.
A. Enlarging lens aperture. The enlarging lens has an aperture. This device has a ring that fits around the lens, and as you turn it, metal blades located between the glass elements of your lens move. They move to make the opening in the lens smaller or larger. There are numbers that correspond to which aperture you have chosen. The smallest number is the largest opening, and vice versa. A large aperture (low number) will let more light through the lens to reach the paper surface. Think of it as sunbathing. The longer you stay in the light, the more tan you will become. Same thing with photo paper. The more light that reaches the surface, the darker the print will become.
B. Enlarging time. According to the same reasoning as aperture - to get more light to the paper surface, you can either open the lens wider, or you can illuminate it longer.
C. Developing time. Many people make the mistake of taking the paper out of the developer when it 'looks right'. The amount of time it's in the developer is different every time, and that is a disaster if you want any consistency in your printing at all. You need to have a predetermined time, and if you think your print is either too light or too dark, you will have to lengthen or shorten your exposure time, or change your lens aperture.
I have chosen 3 minutes as my development time. It is pretty long by most standards, but it works for me and the results I desire. Most people use 1m00s, 1m30s, or 2m00s. Settle for one (I don't think the 1 minute option works real well in most situation, longer times mean the dark tones settle down much better usually).
7. Split Grade Printing
I use a technique that is called 'Split Grade Printing'. Straight filter printing means that you examine the negative and choose which variable contrast filter you use to make your print. Split Grade means I use two different filters in succession, but regardless of negative contrast.
I feel that Split Grade allows me a degree more control of the outcome and a nicer tonal range. I also have a much higher success rate in making prints I like – both my own and when I make prints from negatives that others bring.
Filter number 0 is a low contrast filter. It prints a negative of normal contrast to have less contrast in the print. The blacks are not as intense and rich, and the whites can seem a little dull. That is really useful if you have a negative with a lot of contrast, but we can also use this particular filter with a normal contrast negative and focus on printing the highlights to our liking, while completely disregarding what happens in the darker sections of the print.
I do what's called a test strip. First I put my negative into the negative holder, and adjust the enlarger to the column height that yields roughly the size print I want. Then I bring out the focusing aid and focus the enlarger until it's sharp (or sometimes I make it soft on purpose). I take one full sheet of paper, put it in the enlarging easel, and I cover 75% of it with opaque paper. I set my enlarger timer to 40 seconds, start it, and I count backwards from 40. When I get to 20 seconds I move the paper to cover 50%, at 10 seconds 75% and at 5 seconds I completely remove the cover to illuminate the whole print.
Then I submerse that full sheet of paper into the developer and agitate constantly for the first whole minute, then I lift the corner of the tray every 15 seconds. At 2m45s I lift the print out of the developer and let it drip off for 15 seconds. At precisely 3 minutes I put it in the stop bath. I agitate it there for about 20 seconds, lift it up and let it drain for 10 seconds. Finally I put it in the fixer. Usually fixing a paper takes about 1 minute for resin-coated (RC) stock (and 2 minutes for fiber based paper). I actually turn on the lights after 15 seconds because I'm full of anticipation to look at the results (and it’s safe to do so).
It is time to examine this first stage of the print. I look at the highlights only and determine at what exposure time I like the highlights.
Now I turn off the room lights and put a second piece of paper in the easel. I then proceed to expose this full sheet at the time I liked the highlights at Grade 0.
Now comes what you've been waiting for... Part Two…
I change the Grade 0 filter to the Grade 5, and on top of the initial Grade 0 exposure I now make the same 40 second procedure as before. From 40 to 20 seconds I cover 75%, from 20 to 10 I cover 50%, from 10 to 5 I cover 25%, and the last 5 I let the light fall on the entire print surface.
This sheet of paper now gets transferred into the developer, yet again for 3 minutes. At 2m45s I drain, at 3m00s I submerse in the stop bath. 20 seconds in the stop, let it drip off, and finally into the fixer it goes.
The Grade 5 filter is a high contrast filter. It will hardly make a difference in the brightest of the highlights at all, but it will significantly increase the density and the richness of the blacks. Mid-tones between black and white take on their final tone as well in combination with the Grade 0 exposure.
When safe I turn on the room lights and examine the print, and now I choose the combination of the Grade 0 and Grade 5 exposure I like the best. I make a note of these times and the lens aperture so I don't forget them. I actually take a lot more notes than that, and I keep them with the negatives in case I have to make a reprint when people order prints. This way I can make an exact copy of the original.
Step three of this Split Grade process is to expose the full sheet to your selected Grade 0 and Grade 5 times. Something extremely important is to always do them in the same order. Some people like to do the Grade 5 first, others like to do the Grade 0 first. I like the last technique of Grade 0 first.
So I remove the Grade 5 filter and put the Grade 0 filter back in the filter holder, set my enlarger timer for the time I chose, and expose a new sheet of paper. Then I again change to the Grade 5 filter and expose for the time chosen for that filtration. Now the paper goes into the developer of course, let the 3 minutes pass, stop, fix, and now you should have a print that is a good work print.
8. Work Print
A work print is the first step of making a fine print. A work print is a basic rendition of the subject you photographed. A fine print is one that has been refined in many ways. Here are a couple of techniques.
9. Dodging
I have a set of tools that are attached to steel wire. They are sized roughly like a 25 cent coin and I have an oval, a square, a rectangle, a circle, and a triangle. By putting this device under the enlarging lens during the time exposure, I can cover certain parts of the print that I believe will make it look better if it was brighter.
Since we're doing split grade printing, dodging the Grade 0 exposure would basically give you brighter highlights and mid tones. Dodging the Grade 5 exposure would give you less intense blacks and dark-gray tones.
10. Burning In
Burning in is something you do during additional time after your main exposure is over. You shine more light on certain parts of the print that you would believe look better if they were darker.
Once again in Split Grade printing, burning in Grade 0 would mean darker highlights and light-gray tones. Burning in Grade 5 would mean more intense and richer black and dark-gray tones.
After I am done with my work print I let it dry and I keep it around for a while. I pick it up once in a while and look at it. I hang it on my office wall. Then I decide before my next printing session what areas I want to burn in, which ones I want to dodge, and at what filter grade.
Then when I go in the dark-room again I have a clear idea of what I want to achieve. This is a technique that sounds like a lot of work. It is definitely a lot of work. But I believe that unless you did your absolute best with each print you make, then you cheated yourself of an opportunity to really learn about what works and what doesn't work. And I would much rather come out of the darkroom with one print that I am wholly satisfied with than ten of them that are mediocre.
A couple of final thoughts:
a) Get one type of paper, one type of developer. Always use the same dilution on the developer and get used to these materials. All, and I mean ALL, papers and developers are capable of fine results. The results you get are MUCH more dependent on your technique and skill than the subtle differences between various materials. Please don’t fall in that trap.
b) Buy fresh paper and fresh chemistry. Old paper usually looks very bad and has poor contrast. Old chemistry – the same thing. Fresh paper can be inexpensive if you look in the right place.
c) Have fun, be creative, shoot lots of film and experiment with lighting, subject matter, and print all kinds of negatives. It is rewarding in the long run.
Now it's your turn. I wish you good luck if you decide to use this technique, or any other for that matter. There is no shortage of advice out there. This is just my method and what works for me.
I wish you good light!
- Thomas
Guide to develop film

http://reviews.ebay.com/Black-amp-White-Film-
Developing-Guide_W0QQugidZ10000000003726995
The first thing to remember when learning to develop film successfully is to stick to one film, one developer, and one method of development. It is the only good way to learn a sound technique and to fully explore and maximize the potential of the film and ultimately your print.
Keep in mind that the only purpose of developing film is to make the best prints you can make. It doesn't matter how the negatives look to your eyes as long as they produce the results in the prints that you originally wanted.
What films and developers to use? That is a question I get a lot. Any of the available ones will give you acceptable results, and you can't really go wrong. It also depends on what results you're after. Remember that there are no silver bullets when it comes to film or chemistry. They can help you get the results you're after, but the main factor is technique in exposing the film, developing it, and ultimately printing it. The work of the artist is by far more important than the materials used, so try to focus on repeatable results, and please remember to print your images often, only then can you truly know if your negatives are developed well or not.
Important factors:
1. Temperature. Some developers work fine in a temperature range between 65*F and 80*F, others don't. It's safest to keep the temperature you choose to develop at constant, at least in the beginning, and since so many recommended developing times are recommended at 68*F (or 20*C) I stick to that temperature religiously.
2. Time. Consistency requires exact timing, and the best way to achieve that consistency is to make sure the procedure for developing your film is the same every time. Don't change a thing.
3. Persistance. Don't give up if you don't get results immediately.
Basics:
When developing negative black and white film, the image is of course a negative of what your print will look like. That means the areas with the lowest density of developed silver will be the darkest in the print, and the areas with the highest density of developed silver will become the highlights. The dark tones in the print, or the 'thin' parts of the negative develop slowly, because they receive less light at the time of exposure. How much detail you get in this area of your negative depends on how you exposed it in the camera. Overexposed negatives will generally produce very generous detail in the print shadow areas, while underexposed (too little light) will invariably produce blocked up shadow areas without any detail at all. When you develop your film, the density of the developed silver in those areas is practically unaffected by developing the film longer.
The dense areas of your negative, or the highlights of your print, is a different story. This portion of your negative is determined solely by development. Several factors affects the results, mainly developer concentration, developing time, how you agitate your tank, as well as chemistry temperature. This is the reason why it's so important to be accurate in your methods of developing film.
My method of developing film:
The following method works great for me. You may wish to adopt it and do as I do, or you may find that some other method works better for you. We all have individual needs and desire different looks in the finished print.
1. Presoak the film in plain water. I do this for 3 minutes in water that is the same temperature as the developing chemistry. There are some developers that specifically shouldn't be used with a presoak, but 95% of them benefit from it. (The film emulsion is embedded in gelatin, and it swells. Presoaking makes sure the gelatin is properly swelled up by the time the developer is poured in and ensures more even development).
2. Developer. 20*C or 68*F, I mix one shot 'single use' batches of developer just minutes prior to developing the film. After pouring the presoak out, I immediately pour the developer into the tank. When it's all in the tank I start a timer that displays seconds and minutes, counting backwards from my predetermined developing time. I agitate for the entire first minute by inverting my tank with a lid tightly capped onto it. After about 50-55 seconds have passed, I very firmly rap the tank on the counter space six or seven times. This helps air bubbles that can get trapped on the film to dislodge and come to the top. The air bubbles will adversely affect your film development and turn up as marks, usually round and along the edge of the film strip.
3. Agitation. I completely invert the tank every minute a couple of times, and before setting the tank back down, I rap the tank on the counter top to, once again, dislodge those harmful air bubbles. The inversion ensures that the mixed developer acts evenly on the film surface.
4. Stop bath. 15 seconds prior to the film developing time being up, I start pouring the developer out. Then right as the development time ends, I pour pure water into the tank (at 20*C or 68*F, same as the developer). I do NOT use a stop bath since it is known to sometimes be the source of 'pinholes' in the film emulsion, showing up as dark spots on your prints. Developer is alkaline, stop bath is acid. The very large difference between developer and stop bath pH causes this phenomena to happen. You can use a stop bath if you like, but water stops development almost as well, and you run much less risk of pinholes. I change the water a couple of times for a total rinse of about 1-1.5 minutes.
5. Fixing. This is a critical stage of developing your film. It is extremely important to use fresh fixer, because it removes the unexposed silver in the emulsion that the developer didn't develop. If your fixer isn't fresh, or is spent, it will loose its ability to remove that unwanted silver. I always test my fixer before I use it by putting an undeveloped piece of film into the solution. The film strip should clear within the time the manufacturer recommends to use the fixer. I double the time it takes.
The fixer I use is alkaline. You can use acid fixer if you like. They are OK, but alkaline fixers wash out of the emulsion faster and easier. Do not use an alkaline fixer after using an acid stop bath.
I agitate constantly for the entire duration of the fixing. My fixer takes one minute to clear the unexposed silver when it's fresh, so I fix for two minutes. Then I pour the fixer back into its container and continue to use it until it's spent (when the clearing time exceeds the manufacturer's recommended fixing time, or preferably before that point, it should be discarded).
6. Washing. I use the Ilford-method of washing my film. After pouring the fixer out, I rinse with fresh water and a couple of inversions. Then I dump water. Pour in fresh water, invert tank five times. Dump water. Pour in fresh water, invert tank ten times. Dump water. Pour in fresh water, invert tank twenty times. Dump water. Rinse in fresh water for about five minutes, and finally do a rinse in distilled water to avoid drying marks on the film to the largest possible extent.
7. Wash aid. Some people like to use wash aids such as Kodak Hypo-clearing agent. With the alkaline fixer and the Ilford washing method there is no need. The purpose of washing film is to wash out unwanted chemicals. The hypo-clearing agent itself must be washed out for archival washing, so you're back to square one. With acid fixers, it may be necessary to use, however.
8. Rinse aid. Kodak Photo-flo (one among many similar products, Kodak is the best known), is a good tool to help the water to run off from the emulsion surface. Use distilled water and follow the instructions.
9. Drying. I hang my film from a nylon line with weights on the end. No air movement to minimize dust sticking to the film emulsion. Drying time varies with Relative Humidity level.
This method has been bullet proof for me. Which materials to use is related to personal taste and you will get as many suggestions as people you ask which film or developer is best.
Good luck, and remember to stick to selections that are the same every time, at least until you master those materials and explore them fully. Then you may venture off and try something else on an experiment level. Until then, keep it simple!
- Thomas
 click on the image to enlarge
Monday, October 18, 2010
Jan Grarup
Jan Grarup is a Danish born press photographer. He concentrates in war and conflict photography. He has worked as a staff photographer and freelance for sometime now, and has won many awards for his depictions of various conflicts throughout the world. Here are some photographs he took throughout East Africa during last November. They depict "climate refugees", or people displaced because of the severe drought throughout their homelands. Six years of drought have forced many of them to travel across Africa to find better living conditions.
http://lens.blogs.nytimes.com/2010/02/23/showcase-127/
http://lens.blogs.nytimes.com/2010/02/23/showcase-127/
Mimi Mollica
Mimi Mollica is a Sicilian born photographer. His most recent work is a series of photographs that depict life in Dakar during the construction of the Dakar-Diamniado motorway in Senegal. This is a privately financed toll highway construction project. He used this as an opportunity to guide viewers through a "cultural adjustment to a changing urban landscape." Mollica used a medium-format camera and color film. " He believes that the square format increases the reading time of each photo and provides more opportunity for interaction both in the image and between it and the viewer."
http://lens.blogs.nytimes.com/2010/10/07/senegals-changing-urban-landscape/?ref=africa
-Christine Tampakis
http://lens.blogs.nytimes.com/2010/10/07/senegals-changing-urban-landscape/?ref=africa
-Christine Tampakis
Kate Hopewell-Smith
“I love what I do - which is all about the unique combination of the craft and the people.”


- Helena Salvo
- Kate Hopewell-Smith
Kate is an exceptional lifestyle photographer, i cane across her work by chance while i was looking at some pictures on google. She is a professional photographer who works throughout the UK but shoots mainly in London, Buckinghamshire and the surrounding counties.
Her favourite subjects are people especially children and families. Her photographs seem to capture the reality of the scene, without showing the viewer the presence of the camera. I especially loved the angles she chose to portray her subjects and the colors.
There isn't much about her on the web, as personal information are not disclosed, but i thought that her work was worth sharing.


- Helena Salvo
Subscribe to:
Posts (Atom)